

 "
"If there is one thing in my life I’m the most “most” about, it’s my hair. To be fair to myself (you’re welcome, me), I have A LOT of it and have to be very extra else it will just balloon up around my head in a cloud of tangles like a tragic halo. Due to this hair excess, I am not about a typical blow-dry. It takes me about eleventy billion hours and ensures that I cannot lift my arms above my head for the rest of the day.

To combat my blow-dry curse, I have been showering at night, sleeping on wet hair, and then flatiron-waving my wild hair in the morning for most of my life. I was resigned to this fate and had accepted my limitations, wandering through life as a non-blowdryer, non-morning shower-er like a lost lamb. Until CUE THE ANGELS SIGNING I discovered this magical hairdryer hybrid that has made all my dreams come true. This isn’t even a sponsored post I just LOVE THIS TOOL SO MUCH. After using it for a few weeks, I’ve got my drying/styling time down to 15 minutes which sounds fake but IS ACTUALLY TRUE. Please conclude from my rampant capitalization that I feel ~passionately~ about this and want to spread my hair gospel to you.

Below is the routine I’ve been using for the past two weeks, that I have nailed down to a perfect, bouncy science so that I emerge from my apartment every morning as if I was Connie Britton with the BDE of Dumbledore.

Good hair starts in the shower
I’m a firm believer that your shower determines how your hair will look post-styling which is why I probably exert too much time and effort thinking about my in-shower haircare routine. But good news for you, you may use all my carefully cultivated knowledge without having to spend an entire Saturday roaming the aisles of Ulta, Sephora, and my holy land: Target, obsessively reading the back of shampoo bottles.
For context, my hair is the following:
- Fine, but there is a truly unruly (new band name) amount, which tricked me into thinking I had thick hair until a wise stylist enlightened me.
- A few inches below shoulder length
- Color-treated — I’ve been coloring my hair since I was in high school both for fun and for grey maintenance. “Wait, how old is this [incredibly funny] woman, anyway?!” is what I’m imagining you’re thinking rn. Cool your jets, I’m 26 but inherited my dad’s hair which means lots of silver very early.
- Wavy/frizzy. Left to its own devices, it’s fond of growing three times the normal size like the Grinch’s heart.
I’m very loyal to Kristin Ess products, because after my exhaustive research (see above), I’ve found a lot of her line works really well for my hair while also being budget-friendly and super easy to find in case I randomly run out on a Tuesday. I LOVE her new scalp line and have recently taken an interest in scalp maintenance because the world told me this is something I should be doing. So far, so grand.


Prep your hair for maximum blow-dry success
In my untried youth, when I would get a wild hair to blow dry (lol hair puns), I basically just attacked my virgin hair with blasts of hell-hot heat all LA LA LA THIS IS PROBABLY FINE. Now that heat protectant and blow-dry spray are firmly on my radar, I’ve become a true convert. I refuse to blow-dry without using a prep mist because I’ve seen the first hand how they cut the time of the whole shebang by half.
A great tip I’ve learned from copious Youtube tutorials is to really get in there with your prep mist. Separate hair and spray, spray, spray. Don’t be afraid to truly coat all the hair — not just the top layer — with product before you start.


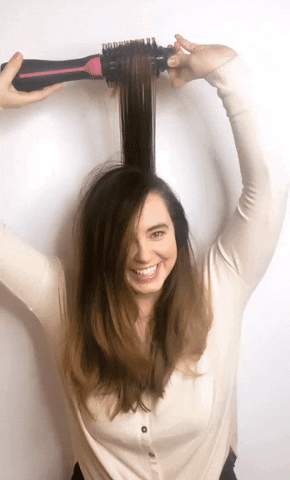
Tips for using the Styler / Volumizer
Since I’m guessing you’ve been using an OG blow dryer for most of your days, this tool takes some getting used to. It’s more like using a flatiron that is also shooting hot air at you. A huge pro is that, unlike a regular blow dryer, my arms hurt NARY A MOMENT while I went along. Here are my best pro (and pro as in “girl who has been using this for two weeks and may frame a photo of herself and the styler together”) tips:
- Wait to start until your hair is about 60-70 percent dry. I do this when I use a regular blow dryer as well, because I hate hate hate the feeling of blasting heat on sopping wet hair. To prevent frizzing out, I apply an oil immediately out of the shower after I blot-dry with a towel. This Verb oil is my favorite — it’s made for fine hair so it’s super light and you’ll still get that enviable bounce.


- The first few times I used the styler, I found that the roots of my hair were still pretty wet in comparison to the rest of my head. To combat this, I start the whole process by turning on the styler and pressing it to my head a few times while I separate the hair — ensuring that I’m getting a nice distribution of heat on my scalp before staring to pull the styler through the hair.
- On the bottom half of my hair, I pull the styler through while pointing it straight down, like a flatiron. Halfway through I start to turn the styler (there’s this handy knob-y part on top that you can use to help you turn) to help encourage a slight wave and bounce at the ends of the hair.
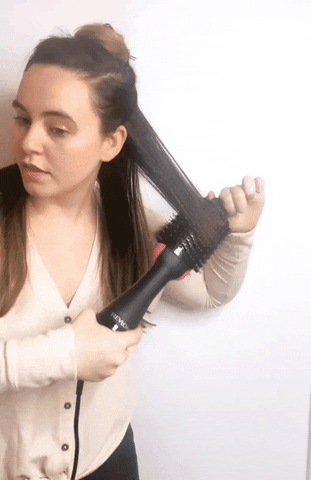
- On the top hair or top 1/3 of my hair, I start by pulling the styler straight up toward the ceiling to encourage volume. Then, I follow the same down n’ twirl move that I do on the bottom half.
- Use smaller sections than you would with a traditional blow dyer — think flatiron sized sections of the hair. I took the styler through each section 2-3 times to get it totally dry.
- When all my hair is dry, I go back over the top with the styler to tame any loose flyaways.

Finish strong
Now that you’ve done all that beautiful work to get a Dry Bar-worthy blowout at home with minimal arm cramping and maximum “DAYUM my hair looks fine,” you want to ensure that your efforts last the rest of the day. I do this by using this Ouai Finishing Crème that is like lotion for your hair. Sounds gross, but is actually ~miraculous~.
If I’m feeling extra Dolly Parton that day, I’ll hit my hair with a few shots of the Living Proof Dry Volume Blast, which I accidentally discovered when I bought a travel size thinking it was dry shampoo. It’s actually a fun, weightless hairspray-like hybrid thing that helps your hair retain it’s big, beautiful, bouncy shape. I’ve tested it through many trying circumstances like road rage, extended family dinners, and Hinge dates. It never disappoints.
You might be thinking, “girllll that was a lot of product to put in your hair for one day.” But remember, I take my hair VERY SERIOUSLY so I’m not afraid to layer product if I know they work and don’t weigh down the hair (#1 day ruiner besides a lot of other more important stuff). I also make sure to use a clarifying shampoo a few times a month to send product buildup to that place Gandalf fell.


