One thing that may surprise many people is that even though I write about beauty products, trends, and treatments for a living, I don’t enjoy making trips to the nail salon. As much as I love the look of a professional manicure, I don’t love the cost, time commitment, or damage that can come with them. Because I never go to the nail salon, I’ve had no choice but to master nail care at home. My nails take a beating every day by typing endlessly (it comes with the job), so I often forgo polish and focus on creating a really clean manicure look. If anyone knows how to stop polish from chipping—please hit me up.
Over the years, these are the tips and tricks I’ve used to ditch polish and enjoy a clean, healthy nail style.
3 Steps to Mastering the Clean Manicure
Step 1: Start with a Clean Base
First things first, no one likes looking at dirty nails. The best part of nail polish is that it hides any dirt that may be lurking under your nails. A recurring theme you’ll notice when it comes to mastering the clean mani look is upkeep. This is why it can be super helpful to keep a nail brush close at hand (excuse the pun). I’m partial to the SPARITUAL Toe & Finger Nail Brush which not only keeps your nails nice and clean, but helps gently exfoliate your hands and cuticles—which will make it easier to absorb all the moisture we’re going to work on embracing in step two.
This nail brush is two-sided with specific bristle lengths to accommodate both your hands at feet. With a comfortable handle made of beachwood and sisal hemp bristles, keeping your nails clean and healthy will become your new favorite form of self-care.
Step 2: Moisturize, Moisturize, Moisturize
The key to a naturally beautiful nail look is to have glowing skin and nails. Your face isn’t the only part of your body that deserves all that pampering. Once a week I like to light the Butter LONDON Champagne Fizz Manicure Candle for the most relaxing at home spa day ever. Once the wax melts, you can apply it as a super moisturizing hand treatment that feels oh so bougie.
For daily upkeep, I turn to the SpaRitual Citrus Cardamom Vegan Moisture Balm which you can apply anywhere. I primarily use it on my cuticles before bed every night, but also reach for it after being harsh with my hands—like after cleaning. Then I lock that balm in with the JUARA Coconut Illipe Hand and Nail Balm which has the texture of a rich hand cream.
This 100% vegan candle is made with a natural skin-softening blend of soybean and coconut oils that melts perfectly into a soothing and conditioning massage treatment for your hands.
Avocado seed oil, rosemary leaf oil, and rose hip oil are the all-star ingredients in this organic and vegan moisture balm that helps prevent moisture loss and promote cell vitality.
Nourish your cuticles, nails, and skin with this conditioning and hydrating balm. Made with ingredients like coconut oil and illipe butter, this balm helps fade age spots, strengthen brittle nails, soften rough cuticles, and reduce the look of dry lines around your knuckles.
Step 3: Smooth It Out
Once your hands are clean and moisturized, it’s much easier to smooth everything out. I love the Dr. Dana’s Nail Renewal System which involves three simple steps. You start with the Glycolic Prep Pen that helps exfoliate the nail bed and cuticles (no cutting cuticles here!) and the Tri-Grit Priming Wand helps remove damaged nail cells. You can then use an orange stick or a metal cuticle pusher to very gently push back your cuticles and scrape away any dead skin without risking the damage and infections that can occur when you cut your cuticles.
I also like to use a basic buffing block you can pick up at any pharmacy or beauty supply store to really smooth everything out and to make my nails shine. Regular upkeep can make it look like you have clear polish on.
After that, you wrap things up by filing your nails into your desired shape. Once you’re done, move onto the third step of the system—the Deep Hydrating Pen—for an extra dose of moisture.
Ensure your nails always look shiny and glossy (no polish required) with this three-step kit that exfoliates, hydrates, and strengthens nails. The best part? It only takes 10 minutes to achieve healthier nails and cuticles.
Optional Step 4 (if you want to glam it up)
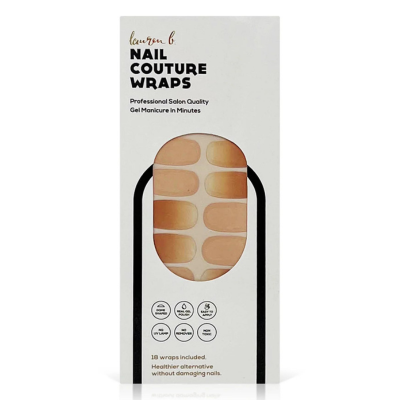
If you do decide you want a glam nail look that won’t chip—without all the damage that comes with a gel salon manicure—the Lauren B Nail Wraps are a really fun solution. They couldn’t be easier to apply, are super gentle on your nails, and last up to two weeks. The strips are made of real gel polish so you get all the durable shine of gel without the hassle. Not to mention, the potential skin and nail cancer risks that come with the UV light required during a gel manicure at a salon. Additionally, all that UV light can lead to premature aging. So why not skip it?
These 100% gel polish nail wraps are designed to give you the look and feel of gel nails without the salon trip, price, and harmful UV lights and chemicals. We love this subtle nude color, but there are more colors and designs to choose from that will suit any style from this brand.
The Takeaway
You don’t need long acrylics, fancy nail art, or vibrant colors to ensure your nails look good. If a professional manicure is your favorite way to treat yourself then go for it! But if you want to simplify your beauty routine, then making it a point of regularly cleaning and smoothing out your nails, while keeping your hands nice and moisturized, will do the trick.


 "
"


